


Valentines Red Velvet Heart Cake Recipe
Nothing says 'I love you' more than our red velvet heart cake, a showstopper beautifully decorated with buttercream icing. Perfect for Valentines Day!
Valentines Red Velvet Heart Cake Recipe
OneSixtyDegrees
20
60 minutes
25 minutes
Dessert
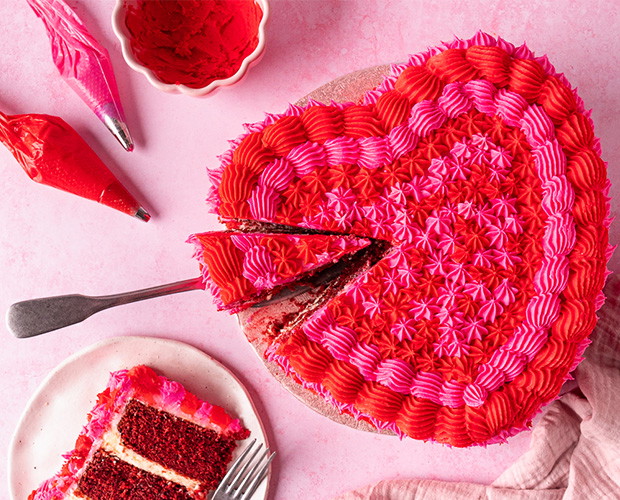
There’s no better way to say "I love you" than with this stunning Heart-Shaped Red Velvet Cake. The soft, moist layers of red velvet cake are paired with a creamy, indulgent filling and topped with a generous swirl of vibrant buttercream icing.
Perfect for Valentine’s Day, anniversaries, or any special occasion- a memorable treat that’s sure to impress. The combination of rich cake and smooth buttercream creates the perfect balance of flavours, while the bright and beautiful icing colours give it a playful touch.
Whether you're sharing it with someone special or celebrating with friends, this heart-shaped cake is the perfect way to add a little extra sweetness to your day.
Ingredients
Sponge
- 400g Whitworths Caster Sugar
- 150g Unsalted Butter, at room temperature
- 4 Large Eggs, at room temperature
- 2 tsp Vanilla Extract
- 1 Tsp White Wine Vinegar
- 150ml Vegetable Oil
- 400g Plain Flour, sifted
- 3 Tbsp Cocoa Powder, sifted
- 1.5 Tsp Bicarbonate of Soda
- 275ml Buttermilk
- 1 Tsp Concentrated Red Food Colouring (we used Sugarflair Red Extra)
Buttercream
- 1.2kg Whitworths Icing Sugar, sifted
- 400g Unsalted Butter, at room temperature
- 300g Full Fat Cream Cheese, at room temperature
- 3 Tsp Vanilla Extract
- Pink and Red Gel Food Colouring
- Piping Tips (we used Wilton #4B, #32, #21)
Directions
Sponge
- Preheat the oven to 160°C fan. Lightly grease and line three 8 inch heart shaped cake tins with baking paper.
- In a measuring jug, stir the red food colouring into the buttermilk and set aside.
- Cream together the caster sugar and butter in a bowl for 2 mins, until light and fluffy.
- Add the eggs one at a time mixing well in between each.
- Mix in the vanilla extract, vegetable oil and vinegar.
- In a large bowl, combine the flour, cocoa powder and bicarbonate of soda. These are your dry ingredients.
- Add half the dry ingredients to the mixed wet ingredients and combine. Then add half the buttermilk and mix. Repeat this step using up the rest of the flour and buttermilk.
- Add equal amounts of the mixture to each tin and bake in the oven for approx. 25 mins.
- Leave the sponges in the tins for 10 mins, then remove and cool on a wire rack.
Buttercream
- With a handheld or stand mixer, beat the butter for 3-5 mins until pale and fluffy.
- Add a third of the icing sugar and beat again until combined.
- Mix in the next third of icing sugar, along with the cream cheese and vanilla extract.
- Then mix the final third of icing sugar and beat the buttercream for 5 mins. If the buttercream is too stiff, add a tablespoon of milk.
- Fold the buttercream using a silicone spatula, pressing out the air bubbles. This will make the buttercream nice and smooth.
Decorating
- Assemble the cake by adding a layer of buttercream to the first sponge (approx. 250g).
- Place the next sponge on top and add the same amount of buttercream on top of the second sponge. Add the third sponge on top.
- Cover the cake with a layer of buttercream (approx. 400g). The piping will cover the cake so this layer doesn’t need to be neat.
- Place the cake in the fridge for at least half an hour to chill.
- Divide the remaining buttercream in half and colour one half red and the other half pink.
- Pipe your design on the cake. We used the following method:
- Red buttercream, piping tip #4B around the bottom and top edge.
- Pink buttercream, piping tip #32 next to the piped red buttercream.
- Red buttercream, piping tip #21 next to the pink buttercream on top.
- Red and pink buttercream, piping tip #21 randomly piped to fill in the gaps.
Tips
Make sure the cream cheese is at room temperature when adding it to the buttercream. If it is too cold, the cream cheese will form lumps in your buttercream.
Comments
Good